

Witch Hazel (Hamamelis x intermedia 'Jelena')
Those of you who have followed me for a while will know that I am obsessed with plants, and particularly their uses in folklore, medicine and magic.
I am NOT a qualified herbalist, although I have read and researched extensively over the years, (and I AM a qualified Horticulturalist ) and I am certainly not giving any advice on medicinal uses of plants, but there are plenty of other things to use them for. One of the things I have spent a lot of time experimenting with over the past year is incense. I've used herbs as dry, loose incense for a long time, but I decided I wanted to try and make it into slower burning blocks, without any of the unpleasant added 'binders' that commercial incense uses.
I'm also a stickler for using only locally grown plants, especially if the incense is to be used in your work. I was lucky to have a huge 'potions cupboard' of my own to ransack, but it's easy to start gathering your own ingredients, even at this time of year. There are crucial rules to follow when wild foraging - Never take anything rare or endangered. Never dig up and destroy a plant. Never take more than 10% of the plant, and especially when harvesting slow growing plants (such as bark from trees) always try to take it from already cut wood, or wind blown branches. There isn't really any way of getting around the rules for harvesting roots - it is illegal to dig them up in the wild. The best thing to do is to grow the plants in your own garden if possible (easy for things such as Elecampane, and Valerian) or find a landowner who will give you permission to gather a small amount from their land. Failing that, you can purchase any herb you like from a reputable, ethically sourced supplier, but personally, I prefer to leave it out if I can't find it locally.

Scots Pine Resin
I spend my days out and about, and am constantly registering new plants and sources of leaves or flowers in the back of my mind, so I know where to go back to when I need something. You don't need to wait till the spring. All these ingredients shown here have been collected in the last week - the first week of January!

Silver Birch bark
The bark was collected from freshly fallen branches in the woods. It can be a bit green and slimy at this time of year, but a quick rinse in cold water quickly removes algae and any insects before drying.

Gorse Flowers
Gorse, or Furze as it tends to be called here in Devon is pretty much in flower for 12 months of the year. It is traditionally used to make wine, but has a lovely coconut scent that works well in teas and incense too. Beware the the vicious spines when gathering!

King Alfred's Cakes (Daldinia Concentrica)
These fungi grow primarily on dead Ash wood. They make a traditional tinder starter for fires, and were supposedly used to transport a tiny ember of fire all day in order to kindle a new fire elsewhere. I haven't tried that, but they can be used as a charcoal block substitute for burning incense (I can't bear the chemical smell of the charcoal tablets you can buy)


Jelly Ear fungus (Auricularia auricula-judae)
Sometimes also called Wood Ears. I found these growing on a sycamore branch. These are edible,
and have well documented medicinal properties. I will dry them and use as an incense ingredient.

Broom (Cytisus Scoparius)
A good incense ingredient, with a rather bitter smell, but equally useful to make a small brush for sweeping!

Oakmoss (Evernia Prunastri)
This is not a moss, but a lichen. I've written about this before, but I'll do so again here. Traditionally used in the perfume industry as a fixative, it is gathered commercially in parts of Europe. Here in the high clear air Dartmoor it grows everywhere, particularly on Oak and Blackthorn, and even on my electric fence wire!

It is REALLY important to remember that lichen grows very slowly, and as can be seen in the photo below, there are many species of lichen, all looking very similar, often growing all together on the same twig, and some of them can be very rare indeed. Make sure you can properly identify which one is Oakmoss. This is the best time of year for harvesting - winter storms bring it down from the trees in large amounts, both loose and on broken twigs. There is NEVER any need to pick lichen off the trees. If you wait till after a heavy rain storm, there will be as much as you could ever use lying around on the ground below the trees. Don't worry if it is muddy - it's pretty robust and will stand a rinse in cold water before you dry it.
WARNING - Oakmoss can cause an allergic reaction in some people.

On this twig shown above, only one clump in the top right corner is actually oakmoss!

Crab apples, both red and gold
I use crab apples a lot, both in amulets and often as a base for the 'wet mix' of incense. I slice them horizontally so they dry in slices, showing the 5 pointed 'apple star', and then use them dry or rehydrate them (usually in a wine mix) .

A section of my 'potions cupboard'
When I began experimenting with solid incense, I couldn't really find much info, so it was a long process of trial and error, writing notes and refining techniques till I came up with a recipe that I felt worked. Initially I looked at methods for making Kyphi, an Ancient Egyptian sacred incense. Although I didn't feel any of those ancient ingredients were appropriate to my work ( I particularly wanted to make incenses that were of THIS land, these ancient granite hills) it was the method that interested me. If you want to experiment yourself, and learn more about the basic process, a set of videos on how to make Kyphi, by Mirth and Reverence on youtube, were by far the most informative and enjoyable. You can find them here: Kyphi making.
I have developed my own method now, and have been working recently on a special set of incense to go with each of the 13 moons of the oracle deck (specifically blended for their properties to help work with each card). However, I thought I'd share a recipe with you, to make one of my favourite blends. You'll see it's not a quick process, but it's so worth taking it slowly, working with each ingredient individually and learning it's strengths and abilities.

Before you start there are some basic safety observations:
Always use a separate pestle and mortar for incense that you don't ever use for food.
If you are sensitive to any of the ingredients, use gloves when handling the raw mix, and be very careful not to breathe in the dust when grinding to a powder - a mask is advisable.
The final incense pastilles smell heavenly, and may look like sweets! Do not let anybody eat them by mistake.
Dartmoor Incense
(For ancestor connection)
This uses ingredients which conceivably could have been growing on these granite hills for thousands of years.
The mix is made in 2 parts - a wet mix and a dry mix. I start both of these at the same time, and add together after a week. Most of my measurements are by eye, or by volume. I don't weigh anything!
(spoons means heaped tablespoons)
WET MIX
2 spoons of dried hawthorn berries
2 spoons dried rowan berries
2 spoons dried crab apple
pound and crush the above ingredients until they are fairly finely minced. Add to a small kilner jar (mine has a capacity of approx 400ml)
then add:
6-8 spoons of wine - I use homemade spruce tip metheglin, but you are unlikely to have that! A homemade, chemical free fragrant wine is ideal, but you can use any wine if you are stuck.
6 spoons of local honey
Mix these all together, with a heather twig if you have, otherwise a stainless steel spoon will do :)
Leave for a week , stirring daily. I leave the lid off for the first day to let the air get to it, and then keep the lid on. Don't worry if it starts to smell a bit fermented - I prefer it if it does this!
DRY MIX
Ideally, into a new jar, you will add one dry ingredient a day, focusing your intent while you grind it in the mortar and pestle. If you just don't have time for that, then you could do them all at once. It won't change the smell - but it may not be quite so 'charged' for your working practises.
6 spoons Scots Pine Resin
2 spoons Heather flowers (Calluna Vulgaris)
2 spoons Heath flowers (Erica Cineria)
2 spoons dried Whortleberries
2 spoons Tormentil root
3 spoons Oakmoss
2 spoons Gorse flower
Pound each ingredient to a coarse powder and add to clean jar. Leave to stand for at least a week, until the wet mix is ready.
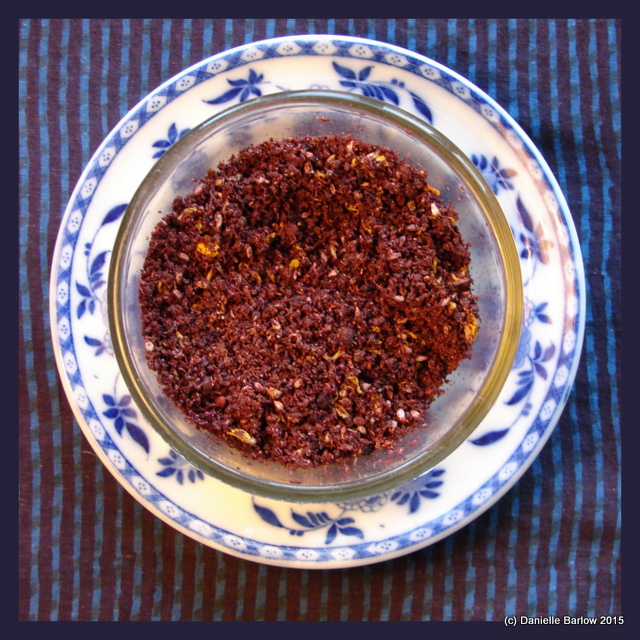
Then combine all the ingredients in a glass bowl, mix well, and leave to mature for at least 24 hours.
It should look like the mixture below.
The next bit is where you can really only learn by trial and error. The mixture needs to be a just the right consistency to mold into small pellets without crumbling. If it seems too dry, you can add a tiny bit more liquid (the same wine you used at the beginning). If it is just too crumbly still, you can add a little more honey, but beware of over adding honey - the incense can be overpowered by a burnt sugar smell if you add too much. If it feels too wet, leave it in a warm place to let a little liquid evaporate.
There is a knack to compressing the crumbly mixture between finger and thumb, and rotating it as you go to form a neat little round pastille. The only way to do it is to practise! Do it over a tray or plate - your first attempts may just crumble everywhere.

As you make them, lay them out on a tray to dry. I always use my
dehydrator at this point, and dry the finished pellets for 3-4 hours in
this, but you could just as well put them in a airing cupboard, or on a
shelf above a rayburn etc. The important thing is not to overdry them
(they will burn up in moments with very little smell if they are bone
dry) They want to feel dry but slightly squishy still. At this point,
they need to be left somewhere for at least a fortnight to 'cure'. It
needs to be warm enough that they wont get damp and mouldy, and just
very slowly finish drying out. Then I pack them away in tubs, so they
can't reabsorb atmospheric moisture. If you can bear to leave them to
mature for another couple of months, the scents become much richer and
more mellow.

I can never resist testing one before they are packed away! This a good thing, as you can work out if they are at the right consistency. If you have overdried them, it is not the end of the world. I have had good results from breaking the pellets down again, rewetting, and starting the whole pellet making process again. It's a pain though!


How to burn pellets
This type of incense doesn't burn in the same way as commercial incense does. If you burn it with a direct flame, it will simply catch fire and burn quickly with vast amounts of smoke. You may want this if you are outside doing ceremony and have a censer that you swing, or embers to throw it on, but usually it's better if you aim for a slower burn, and a more gentle release of smoke so that you get all the subtle flavours of ingredient present.
I have found that the best way to do this is with a 'sieve plate' burner. You can buy these, but I improvise with a tealight holder and a metal tea strainer. This holds the pellet a couple of centimetres above the tiny flame, and the pellet, once it has cured properly, smoulders slowly and gently. You still need to use this in a well ventilated space - it IS smoky.

5 comments:
I love your potions cupboard, I'm afraid mine is a bit smaller. I have been told to gather gorse when the sun shines, have you heard this? App I makes it less bitter. Lovely blog post, thank you.
What a fascinating post on making incense. Not having access to forests or woods I grow lavender, basil, rosemary and other herbs wrapping them together to dry for smudging my home. I love the aroma, I can only imagine how good your incense smells.
Quite the process, Danielle! Looks beautiful and I can only imagine the smell :)
Lovely to hear all about your incense making Danielle. So interesting, I bet they smell delicious. I have been collecting dried flower petals (back in the summer) and a few bits and pieces, even some of the Christmas tree needles, with a view to having a go myself. Have never made any, so am a total beginner. :)
Really enjoyed this post, Danielle! Thanks so much for sharing! : )
Post a Comment